How to Build Claude Skills
This post is a set of notes on Claude’s The-Complete-Guide-to-Building-Skill-for-Claude.
Fundamentals
A Skill is primarily composed of the following files and folders:
- SKILL.md (required): Instructions in Markdown with YAML frontmatter
- scripts/ (optional): Executable code (Python, Bash, etc.)
- references/ (optional): Documentation loaded as needed
- assets/ (optional): Templates, fonts, icons used in output
Progressive Disclosure
- Layer 1 — YAML frontmatter: The YAML block at the top of SKILL.md describes the skill’s name, description, and other metadata. Claude checks this first.
- Layer 2 — SKILL.md body: If Claude determines that layer 1 matches the current task, it reads the rest of SKILL.md.
- Layer 3 — Additional files: If needed, Claude reads files in
references/,assets/, and so on.
The Relationship Between MCP and Skills
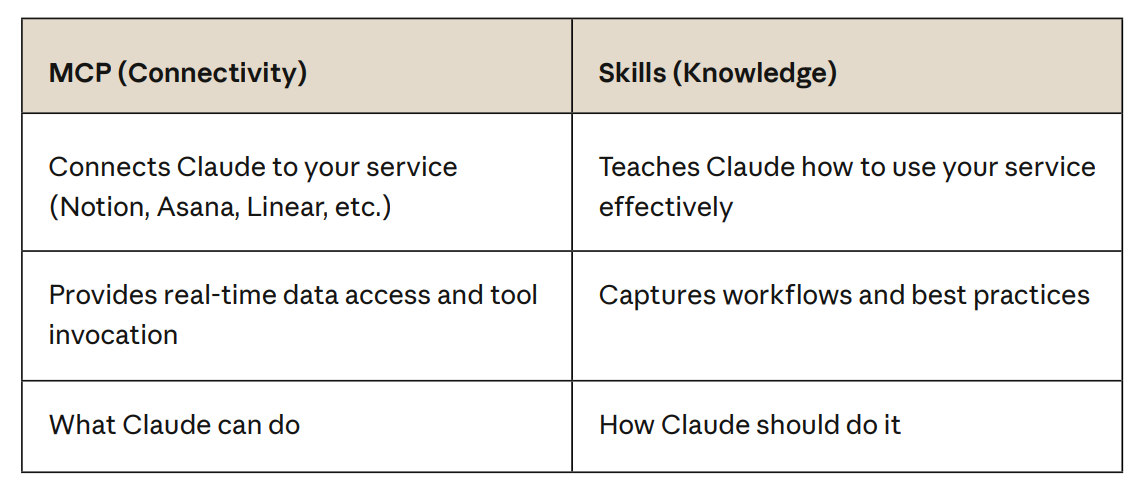
MCP provides tools, while Skills tell the AI which tools to use and how to automate a workflow.
Planning and Design
How to design a skill.
Start by thinking through:
- What task needs to be accomplished
- What steps are involved (the workflow)
- What tools are required
- What domain knowledge or best practices are needed
Skill File Structure
your-skill-name/
├── SKILL.md # Required - main skill file
├── scripts/ # Optional - executable code
│ ├── process_data.py # Example
│ └── validate.sh # Example
├── references/ # Optional - documentation
│ ├── api-guide.md # Example
│ └── examples/ # Example
└── assets/ # Optional - templates, etc.
 └── report-template.md # Example
There must be no README.md inside the skill folder.
SKILL.md
Minimum required format:
---
name: your-skill-name
description: What it does. Use when user asks to [specific
phrases].
---
Fields:
- name (required): kebab-case only; must match the folder name
- description (required):
- What the skill does
- When it should trigger
- compatibility (optional): Describes environment requirements, etc.
- metadata (optional): Describes the author, etc.
-
  metadata:
      author: ProjectHub
      version: 1.0.0 mcp-server: projecthub
-
- license (optional): Open-source license
How to write a good description
Format: [What it does] + [When to use it] + [Key capabilities]
Some examples:
# Good - specific and actionable
description: Analyzes Figma design files and generates
developer handoff documentation. Use when user uploads .fig
files, asks for "design specs", "component documentation", or
"design-to-code handoff".

# Bad - Missing triggers
description: Creates sophisticated multi-page documentation
systems.
You can refer to the following real-world skill examples for reference:
Testing and Iteration
This section covers how to test and iterate on your skills. It is recommended to use the Skill Creator skill to generate your own skill.
There are three main areas to test:
- Trigger timing
- Functionality
- Performance
Trigger Timing Tests
The goal is to observe whether the skill fires at the right moment. Test cases should cover two types of user requests: those that should trigger the skill and those that should not. For example:
Should trigger:
- "Help me set up a new ProjectHub workspace"
- "I need to create a project in ProjectHub"
- "Initialize a ProjectHub project for Q4 planning"
Should NOT trigger:
- "What's the weather in San Francisco?"
- "Help me write Python code"
- "Create a spreadsheet" (unless ProjectHub skill handles
sheets)
Functionality Tests
Verify that the skill can actually complete its intended task. Key things to observe:
- Whether outputs are correct
- Whether API calls succeed
- Error handling
- Edge case coverage
Performance Tests
Non-functional metrics such as the following:
Without skill:
- User provides instructions each time
- 15 back-and-forth messages
- 3 failed API calls requiring retry
- 12,000 tokens consumed

With skill:
- Automatic workflow execution
- 2 clarifying questions only
- 0 failed API calls
- 6,000 tokens consumed
A skill needs continuous iteration — only by fixing mistakes and refining the instructions each time something goes wrong can it reach a polished state.
Distribution and Sharing
How to use someone else’s skill and how to share your own.
The Manual Approach
- Obtaining a skill:
- Download the skill folder or archive from somewhere like GitHub
- Write one yourself locally
- Using a skill:
- Locally: place the skill folder under
.claude/skills/in your current project or home directory - Claude web: upload to Claude.ai via Settings > Capabilities > Skills
- Locally: place the skill folder under
Automated: Plugins & Marketplace
Obtaining and using skills
To use skills via the Claude Code VS Code UI:
- First add a Marketplace:
show command menu → Manage plugins → Marketplaces → Add - Then install a plugin from that Marketplace:
Manage plugins → Plugins— search for or select the plugin you want and install it
Sharing your own skills
Set up your own Marketplace to share your skills with others.
The simplest approach is shown below. The folder structure must be kept consistent. Plugins are implicitly declared inside marketplace.json (so you do not need to create a separate folder for each plugin). See anthropics/skills as a reference.
your-marketplace/                ← repository root
├── .claude-plugin/
│   └── marketplace.json         ← Marketplace definition (plugins declared here)
├── skills/                      ← all skills live here
│   └── hello/
│       └── SKILL.md
│   └── greet/
│       └── SKILL.md
├── .gitignore
└── README.md
The most important file is marketplace.json. Its format is as follows:
{
  "name": "obsismc-marketplace", // your marketplace name
  "owner": {
    "name": "ObsisMc"
  },
  "metadata": {
    "description": "A collection of agent skills by ObsisMc, compatible with Claude Code and other Agent Skills-compatible tools."
  },
  "plugins": [
    {
      "name": "test-skills",  // your plugin name
      "source": "./",         // set the base path
      "strict": false,
      "description": "A collection of useful agent skills",
      "skills": [
        "./skills/hello",     // your skill path
        "./skills/greet"
      ]
    }
  ]
}
Once pushed to GitHub, others can use your Marketplace. Your skill’s fully qualified name will be /test-skills:hello.
To test the plugin locally, run claude --plugin-dir . to load the current directory as a plugin.
For the complete Marketplace setup process, see Create and distribute a plugin marketplace
Additional Tips
Writing a README: focus on what the skill produces, not what it does internally
✅ Good:
"The ProjectHub skill enables teams to set up complete project
workspaces in seconds — including pages, databases, and
templates — instead of spending 30 minutes on manual setup."
❌ Bad:
"The ProjectHub skill is a folder containing YAML frontmatter
and Markdown instructions that calls our MCP server tools."
Highlight the MCP + skills story:
"Our MCP server gives Claude access to your Linear projects.
Our skills teach Claude your team's sprint planning workflow.
Together, they enable AI-powered project management."
Patterns and Troubleshooting
Refer to the original document; revisit this section when you actually encounter an issue.